Matrix multiplication experiments with Manim
The consistent advice on linear algebra is that calculation alone will only get you so far; at some point the intuition has to click geometrically. With that starting to happen, I wanted to see the transformation actually move.
After working through a lot of 3Blue1Brown for intuition, I've started getting into his Manim library in Python. This is a simple experiment: a [2 0; 0 1] transformation applied to a (2,2) vector. Working through the code forced me to understand what's actually happening geometrically.
A (2,2) to (4,2) linear transformation
This stretch is represented by:
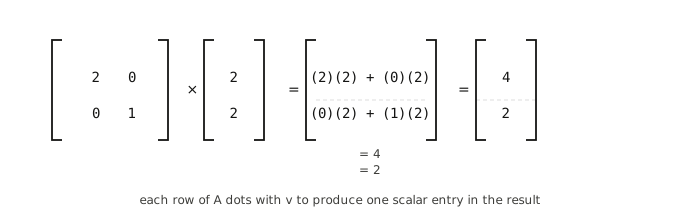
But hey, there’s a better way to visualize matrix multiplication. See the (2,2) vector on the right? Move it upward, and then scoot the resulting (4,2) underneath it like below:
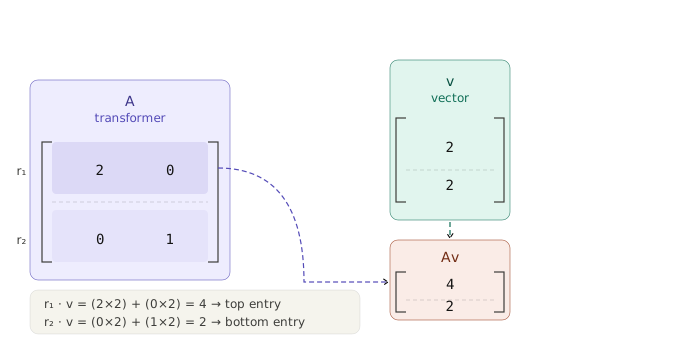
To get the top number in Av, you just take the row and column directly over that spot. So for the top number in Av, you just mentally rotate the (2,0) in A upward and compare it to the (2,2) in v. Imagine it’s an old clock. The vector is the hour hand at 12, and the transformer is the minute hand at the 9 spot. Just rotate that minute hand up, as-is, and do your calculation.
Two times two is four and 0 times 2 is zero, leaving four as the answer.
Same deal for the lower number of Av. Rotate up the (0,1) up to the 12 ‘o clock position. Zero times 2 is 0 and 1 times 2 is 2. So the answer is two.
This means that you have (4,2) as the result.
This is a much cleaner model for what’s actually happening.
In effect, you’re taking a (2,2) vector, which starts at the origin (0,0) and runs two up and two right, and then is transformed and moves right two more units.
It’s also logical. If your identity matrix is [1 0; 0 1] and that keeps the vector exactly as it is, then a [2 0; 0 1] is probably going to double one thing.
Here's the code:
from manim import *

class TransformGrid(Scene):
    def construct(self):
        background_plane = NumberPlane(
            x_range=[-4, 4, 1],
            y_range=[-3, 3, 1],
            x_length=8,
            y_length=6,
            background_line_style={
                "stroke_color": BLUE_D,
                "stroke_width": 1,
                "stroke_opacity": 1
            },
            axis_config={"stroke_opacity": 1}
        )

        plane = NumberPlane(
            x_range=[-4, 4, 1],
            y_range=[-3, 3, 1],
            x_length=8,
            y_length=6,
            background_line_style={
                "stroke_color": BLUE_D,
                "stroke_width": 1,
                "stroke_opacity": 1
            }
        )

        vector = Arrow(
            start=plane.c2p(0, 0),
            end=plane.c2p(2, 2),
            buff=0,
            color=YELLOW
        )

        ghost = vector.copy()
        ghost.set_opacity(1)

        self.add(background_plane, plane, ghost, vector)
        self.wait(1)

        matrix = [[2, 0], [0, 1]]
        self.play(
            ApplyMatrix(matrix, plane),
            ApplyMatrix(matrix, vector),
            run_time=2
        )
        self.wait(1)
Save the script as test-grid.py and execute in shell with something like this:
manim -pql test-grid.py TransformGridI used some Claude help with the code to start, but made some heavy modifications from there. Specifically, I had to adjust the plane to make the underlying plane unmoving to illustrate the change.
Making the underlying plane unmoving means you lose something, though. The animation shows the arrow is moving, but what’s actually happening is that the plane is actually stretching and that’s pulling the arrow. See how the arrow at the end looks like it’s been stretched like silly putty? The stretch is happening to the whole canvas.
Just imagine you’re playing with an image in Photoshop and stretching an image in standard definition to fit into widescreen. The static diagram tells you the answer. The animation tells you what the answer means.